How to Repair Old Sealant Joints?
Repairing old sealant joints in buildings is essential to maintain the structure’s integrity, weatherproofing, and aesthetic appearance. Over time, sealants can degrade due to exposure to the weathering, external elements like chemicals, or movements of the building, or simply reaching the end of their service life.
Here is a step-by-step guide on how to repair old joint sealants.
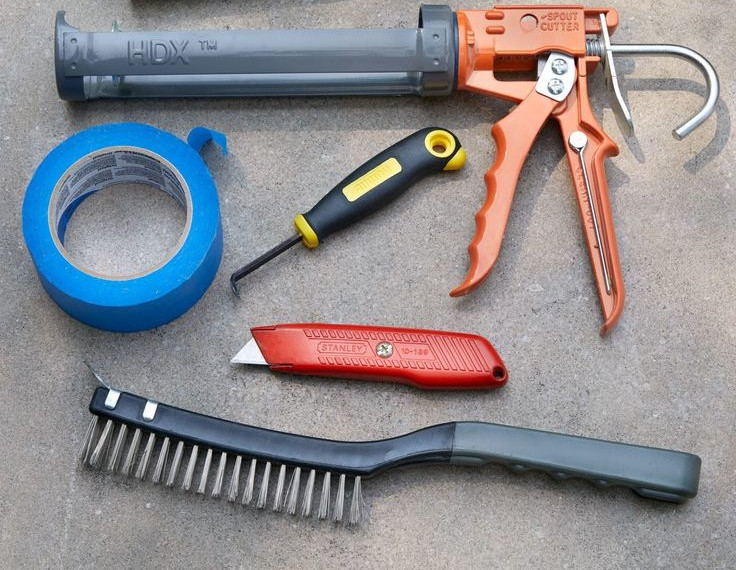
Tools and Materials Needed
- Utility knife or scraper
- Caulking gun
- Sealant remover or solvent
- Masking tape
- New sealant (compatible with the existing materials)
- Joint backing material (backer rod or bond breaker tape)
- Cleaning materials (rags, brush, cleaning solution)
- Protective gear (gloves, safety glasses)
Step-by-Step Repair Process
Step 1: Inspect the Joints
- Examine the Condition: Look for cracks, gaps, peeling, or other signs of deterioration in the old sealant.
- Determine the Cause: Identify any underlying issues, such as structural movement or water intrusion, that may have contributed to the sealant failure.
Step 2: Remove the Old Sealant
- Cut Away the Old Sealant: Use a utility knife or scraper to carefully remove the old sealant from the joint. On porous substrates like concrete, sander or grinder may do the removal job better. Be cautious not to damage the surrounding surfaces.
- Use Sealant Remover: Apply a sealant remover or solvent if necessary, to soften and loosen stubborn sealant residues.
Step 3: Clean the Joint
- Clean the Surface: Thoroughly clean the joint with a brush and cleaning solution to remove dirt, dust, and old sealant residues.
- Dry the Area: Ensure the joint is completely dry before applying the new sealant, as moisture can affect adhesion.
Step 4: Prepare the Joint
- Apply Masking Tape: Place masking tape on either side of the joint to protect the adjacent surfaces and ensure a clean finish.
- Install Backer Rod or Bond Breaker Tape: Insert a backer rod or bond breaker tape into the joint if needed to control the depth of the new sealant and improve adhesion.
Step 5: Apply the New Sealant
- Choose the Right Sealant: Select a sealant compatible with the materials and environmental conditions of the joint.
- Apply the Sealant: Carefully apply the new sealant into the joint, ensuring a continuous and even bead.
Step 6: Tool the Sealant
- Smooth the Sealant: Use a spatula or jointing tool to smooth the sealant and ensure good contact with the joint surfaces.
- Remove Masking Tape: Carefully remove the masking tape before the sealant starts to skin over to achieve a clean edge.
Step 7: Allow the Sealant to Cure
- Curing Time: Follow the manufacturer’s instructions for the sealant’s curing time, which may vary depending on the type of sealant and environmental conditions.
- Avoid Disturbance: Ensure the sealant is not disturbed during curing to maintain its integrity and appearance.
Additional Tips
- Choose the Right Sealant: Different sealants have different properties; select one suited for the specific application and environmental conditions.
Consider Weather Conditions: Avoid applying sealant in extreme temperatures or during rain to ensure proper adhesion and curing.
FAQ:
FAQ 1. How long can your sealant last? What is the service life?
The service life of a sealant varies widely depending on the type of sealant used, environmental conditions, and the specific application. Understanding the expected lifespan of a sealant can help in planning maintenance schedules and budgeting for replacements. Below is an overview of different types of sealants and their typical service life:
Factors Affecting Sealant Service Life
- Type of Sealant:
- Different sealants are formulated for specific purposes and conditions, leading to varying lifespans.
- Environmental Conditions:
- Weather Exposure: UV radiation, temperature fluctuations, humidity, and weather conditions can impact sealant longevity.
- Chemical Exposure: Contact with chemicals, pollutants, or saltwater can degrade certain sealants more quickly.
- Application Quality:
- Surface Preparation: Proper cleaning and preparation of surfaces before application significantly affect adhesion and durability.
- Application Technique: Correct application methods, including bead size and tooling, can influence the sealant’s performance.
- Movement and Stress:
- Structural Movement: Buildings or joints that experience significant movement or stress can shorten the service life of sealants.
- Sealant Maintenance:
- Regular Inspections: Regular checks and prompt repairs can extend the service life of a sealant.
Typical Service Life of Different Sealants
Here’s a table summarizing the typical service life* of various sealant types under average conditions:
Sealant Type | Service Life (Years) | Description |
Silicone Sealant | 15-20 | Excellent UV resistance and flexibility. Used in windows, doors, and bathrooms. Long-lasting but can be affected by extreme movement or chemicals. |
MS Polymer Sealant | 10-20 | Combines benefits of silicone and polyurethane. Good UV and chemical resistance. Versatile for various applications. |
Polyurethane Sealant | 5-10 | Traditional for construction joints and outdoor use. Can degrade in UV exposure if not UV-stabilized. |
Acrylic Latex Sealant | 2-7 | Water-based and easy to clean. Used for interior applications. Less durable in extreme conditions. |
To maximize the longevity of sealants, consider the following practices:
- Regular Inspections: inspect sealant joints periodically for signs of wear, cracking, or detachment.
- Timely Repairs: address any issues promptly to prevent further damage and maintain the sealant’s effectiveness.
- Proper Application: ensure correct application techniques, including surface preparation and proper joint design, are used.
- Environmental Considerations: choose sealants appropriate for the specific environmental conditions they will face.
- Use of Primers: apply primers if recommended by the sealant manufacturer to enhance adhesion.
- Protective Measures: use UV-protective coatings or covers in areas with significant sun exposure if using non-UV-stable sealants.
By understanding the factors affecting sealant longevity and following best practices for maintenance and application, you can ensure that the sealant provides optimal performance throughout its expected service life.
FAQ 2. Can I apply new sealant directly on the existing sealant bead? Does it bond?
Applying new sealant directly over existing sealant is generally not recommended due to several potential issues that can affect the bond, performance, and appearance of the new sealant. However, in some cases, it might be feasible with proper preparation. Here are the reasons why applying new sealant over old sealant is not usually ideal and the conditions under which it might work:
Reasons to Avoid Applying New Sealant Over Existing Sealant
- Poor Adhesion:
- Old Sealant Degradation: If the existing sealant is degraded, cracked, or peeling, the new sealant may not adhere well. The bond between the new sealant and the old one can be weak, leading to premature failure.
- Surface Contaminants: Dirt, dust, and other contaminants on the old sealant can prevent proper adhesion of the new sealant.
- Incompatibility Issues:
- Different Sealant Types: Different sealants have different chemical compositions. Applying a new sealant that is incompatible with the old one can result in poor bonding or chemical reactions that degrade the sealant.
- Uneven Surface:
- Appearance: Applying new sealant over old can result in an uneven surface, affecting the aesthetic appearance of the seal. It may also lead to a bulky appearance if the old sealant is not fully removed.
- Sealing Effectiveness: An uneven application might lead to gaps or voids, compromising the sealant’s effectiveness.
- Reduced Flexibility:
- Joint Movement: The added thickness of applying new sealant over old can reduce the flexibility of the sealant joint, making it less able to accommodate movement. This can lead to cracking or peeling.
When It Might Be Possible to Apply New Sealant Over Old
If removing the existing sealant is not possible, and you must apply new sealant over the old one, follow these guidelines to improve the chances of success:
- Thorough Cleaning:
- Remove Debris: Clean the old sealant thoroughly to remove any dirt, dust, or oils that may inhibit adhesion.
- Smooth Surface: Ensure the surface is as smooth and even as possible.
- Compatibility Check:
- Same Type of Sealant: Use a new sealant that is chemically compatible with the old one (e.g., silicone over silicone). Generally new sealant of the same type would bond to the old one, whereas sealant of different type might not. Compatibility test is always recommended.
- Partial Removal:
- Remove Loose Material: Cut away any loose, peeling, or degraded sections of the old sealant to ensure a stable base for the new sealant.
- Use of Primer:
- Sealant Primer: Applying primer would help adhesion.
- Test Application:
- Small Area Test: Test the new sealant on a small, inconspicuous area to ensure proper adhesion and compatibility before applying it to the entire joint.
- Application Technique:
- Proper Tools: Use appropriate tools like a caulking gun and spatula to ensure even application.
- Tool the Sealant: Smooth the new sealant immediately after application to achieve a neat finish.
Conclusion
While applying new sealant over existing sealant is generally not recommended, it can be done with careful preparation and consideration of compatibility. If the existing sealant is significantly degraded or incompatible with the new sealant, it is best to remove the old sealant entirely before applying a new one. This ensures a reliable bond, optimal performance, and a clean appearance.